Universal IO
Experimentation in a Timing Object
Here is a development log of trying to make a universal intensive operation timer. This is all pretty much off the top of my head. I’ll be making notes on here as localhost development proceeds throughout the day.
Step 1
Setting up our prototype object
**pseudo code
uIO = function(args){
	args = args || {};
	args.rate = args.rate || 1000/60;
	args.callback = args.callback || function(tick){ console.log('tick:'+tick); };
	this._init();
	return this;
};


uIO.prototype._init = function(){
	this._startedOn = (new Date()).getTime();
	this._lastTick = this._startedOn;
	this._io = null;
};

var timer = new uIO();
console.log(timer);
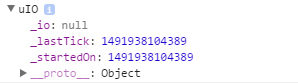
Right away I start by defining a global scoped function that will be the instance of our timer when ever we need it. It is done this way so that we can have multiple instances of the same timer running on other objects on our page. Elements like canvas/dom animations, continuous polling events to the server, and other functions can be controlled from this object.
If we were to run this script on a page our console would just output the uIO object that was just created which is nothing fancy right now, but at least some sort of framework we can start building up is there! What we need to do now is start the timeout loop and start having this “intensive operation” timer start doing something.
uIO = function(args){
	args = args || {};
	args.rate = args.rate || 1000/60;
	var self = this;
	args.callback = args.callback;
	args.holdStart = args.holdStart || false;
	this._init(args);
	return this;
};


uIO.prototype._init = function(args){
	this._startedOn = null;
	this._lastTick = null;

	this._loop = null;
	this._lastTick = null;
	this._lastFrame = null;
	this._delta = 0;
	this._tick = 0;
	this._fps = 0;

	this.active = false;
	this._rate = args.rate;

	if(!args.holdStart){
		this._start();
	}
};

uIO.prototype._start = function(){
	var now = (new Date()).getTime();
	this._startedOn = this._lastFrame = this._lastTick = now;
	var self = this;
	this.active = true;
	this._loop = setInterval(function(){
			self._run();
		}, 0);
};

uIO.prototype._run = function(){
	var now = (new Date()).getTime();
	if( now - this._lastFrame >= this._rate){
		this._RUN(now);
	}
	this._tick++;
	this._lastTick = now;
};

uIO.prototype._RUN = function(now){
		this._fps = (1000 / (now - this._lastFrame)).toFixed(0);
		this._delta = (now - this._startedOn) * 0.001;
		this._lastFrame = now;
};

var timer = new uIO();
console.log(timer);
Now we have something, with the additions just made the timer should now be able to run at a close to set amount and have a delta variable available to us.
This will be the core of the system for timing. The ext steps will be to include a callback that is interchangeable for the object to run when ever the _RUN function has fired.
Step 2
Debug and WP Set-up
What can we do with this new Object now? The first thing that comes to my mind is animations on a canvas element, or physic calculations that require a time step. In order to see if things are running according to principle I will take the new object and firstly have it output to a canvas element, and then refine the output to several different timing functions that can change the motion of an object or shape on the canvas. I am thinking the smartest way to do this for right now, will be include a new Object type under the scope of the uIO Object that will function as a debug output.
When starting these changes the first thing I want to do is go back to the uIO objects _init function and add “this._debugOn = false;”, so that there is a flag in the parent object for later use. Next I set up a new Object type:
/*-----DEBUG LAYER STUFF------*/
uIO.prototype.showDebug = function(target){
	if(!this._debugOn){
		this._debugOn = true;
		this._debugLayer = new uIO.DEBUG(target || null, this);

	};
};

uIO.DEBUG = function(target, parent){
	this._target = document.getElementById(target) || document.body;
	this._canvas = document.createElement('canvas');
	this._canvas.style.width = "100%";
	this._canvas.style.height = "100%";
	this._resize();
};

uIO.DEBUG.prototype._resize = function(){
	this._canvas.width = this._canvas.offsetWidth, this._canvas.height = this._canvas.offsetHeight;
};
/*-----END DEBUG LAYER STUFF------*/
What was added was first a prototype of the uIO object which will control the parenting chain of the objects. In theory you could call the DEBUG object manually but this just keeps things tidy. Next the actual sub Object this is another function that now holds some information for our output canvas and a prototype method to make sure that the canvas has a resize function which I will later tie into a window resize event.

The thing that needs to happen now though, as the project is progressing because this is specifically for the purpose of documenting the development and demonstrating it on my website (which is powered by WordPress), I will need to start making changes to prepare my post to display these debug objects, and have access to the newly created uIO. In order to “hook” into the post with my own JavaScript Libraries fast and with the ability to update the script globally but choose which pages are even accessing the content I use the Scripts-n-Styles Plugin. This is a great plugin with “The Hoop’s” shortcodes it provides access to. After pasting the script into this section of the plugin it created me a shortcode [hoops name=”uIO-lib”], which I can now include in pages, or posts on my WP site. The technique I will use to access this can be directly on the post elements html or through another hooped shortcode that has a script that fires after the creation of the page, in order to ensure that all DOM content is accessible at the time of the creation of the uIO Object.
On my wordpress post, for example this one I need to create a target for the output canvas to go to otherwise it will default target the body of the document which is not the desired effect at this current moment for example:
<div id='output-target-example' style='display:block;width:600px;height:300px;border:1px solid lightgrey;'></div>
And if everything is going according to plan, you should see such container div above now, though nothing is outputting to it. Development at this point becomes a little bit different. What I am going to do is first modify my localhost page to kinda simulate the elements and situation that I am trying to accomplish on the publicly hosted version which makes it look like the following.
<body>
<div id='output-target-1' style='display:block;width:300px;height:300px;border:1px solid lightgrey;'></div>
<script>
/*---- MAIN LIB ----*/
uIO = function(args){
	args = args || {};
	args.rate = args.rate || 1000/60;
	var self = this;
	args.callback = args.callback;
	args.holdStart = args.holdStart || false;
	this._init(args);
	return this;
};


uIO.prototype._init = function(args){
	this._startedOn = null;
	this._lastTick = null;

	this._loop = null;
	this._lastTick = null;
	this._lastFrame = null;
	this._delta = 0;
	this._tick = 0;
	this._fps = 0;

	this.active = false;
	this._rate = args.rate;
	this._debugOn = false;

	if(!args.holdStart){
		this._start();
	}
};

uIO.prototype._start = function(){
	var now = (new Date()).getTime();
	this._startedOn = this._lastFrame = this._lastTick = now;
	var self = this;
	this.active = true;
	this._loop = setInterval(function(){
			self._run();
		}, 0);
};

uIO.prototype._run = function(){
	var now = (new Date()).getTime();
	if( now - this._lastFrame >= this._rate){
		this._RUN(now);
	}
	this._tick++;
	this._lastTick = now;
};

uIO.prototype._RUN = function(now){
		this._fps = (1000 / (now - this._lastFrame)).toFixed(0);
		this._delta = (now - this._startedOn) * 0.001;
		this._lastFrame = now;
		if(this._debugOn){this._debugLayer._DRAW()};
};


/*-----DEBUG LAYER STUFF------*/
uIO.prototype.showDebug = function(target){
	if(!this._debugOn){
		this._debugOn = true;
		this._debugLayer = new uIO.DEBUG(target || null, this);

	};
};

uIO.DEBUG = function(target, parent){
	this._parent = parent;
	this._target = document.getElementById(target) || document.body;
	this._canvas = document.createElement('canvas');
	this._canvas.style.width = "100%";
	this._canvas.style.height = "100%";
	this._target.appendChild(this._canvas);
	this._resize();
};

uIO.DEBUG.prototype._resize = function(){
	this._canvas.width = this._canvas.offsetWidth, this._canvas.height = this._canvas.offsetHeight;
	this._ctx = this._canvas.getContext('2d');
};

uIO.DEBUG.prototype._DRAW = function(){
	var cvas = this._canvas;
	var cW = cvas.width, cH = cvas.height;
	var ctx = this._ctx;
	ctx.clearRect(0,0,cW,cH);
	ctx.font = "16px Arial";
	ctx.fillText("FPS:",0,18);
	ctx.fillText(this._parent._fps,60,18);
};
/*-----END DEBUG LAYER STUFF------*/
/*---- END MAIN LIB ----*/


/*---- Page Script ----*/
document.addEventListener('DOMContentLoaded', function(){
	var test1 = new uIO();
	test1.showDebug('output-target-1');
	console.log(test1);
}, false);
/*---- END Page Script ----*/

</script>
</body>
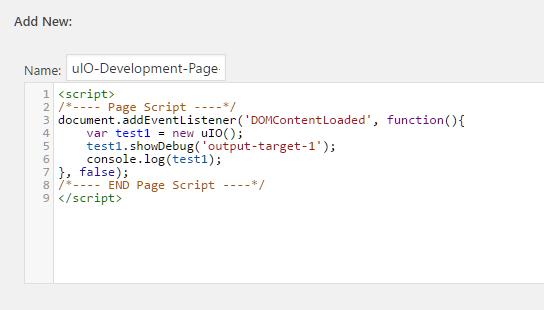
By the way if anyone reading this is wondering how I am outputting the code without it running on the post simply wrap any section like that in <pre> for just JS code and then <pre><xmp> for anything that has HTML elements as well. Some styling will be needed to display that correctly but just a little tidbit if you were wondering. Now I need to update the script on the WP side so I go back to my Scripts and Style Admin section, and make the appropriate changes. I also have to create a new Hoop for the section that will interact with this specific page, like I said earlier this can be inline, but for ease of access I prefer to hook it in.
Time to give all this a shot, by now placing the Hoops on this post, and making sure that the element it is looking for in our Development page hook is available for it!
By the looks of it things are going well, I now have a small box that is displaying the fps, this can later be extended to do more but for now here we go. Now its time to create a new Object type that will be for drawing different variations of timing equations and different visualization based on what ever variables from the uIO objects timings. **The one thing I am noticing at this time is that on my system its saying 50fps and holding that pretty true, that is honestly wrong and I will have to go back to figure out if its the output or my actual frames/rate that is incorrect for now well just move on as this is a merely just a demonstration. If this we going to be a refined library this would need to be debugged at some point!
Step 3
Visualizing Output and Timings
Now that there is a Object that is generating both a tick time and a delta time, we can start doing some more advance testing. In addition after just implementing a basic canvas and drawing to it the dynamically changing fps variable I now have the option to create a new Object type for handling equations in the form of nested functions. This Object, will have a uIO object that is a child of itself and will be accessed by the uIO child in order to fire off its draw event or will create a uIO object with an assigned callback for accessing the parent Objects draw function… I know that might sound complicated but stick with me. For the time being, I am going back to localhost development in these next explanations.
<body>
<div id='output-target-1' style='display:block;width:200px;height:40px;border:1px solid lightgrey;'></div>
<div id='output-target-2' style='display:block;width:400px;height:100px;border:1px solid lightgrey;position:relative;'>
	<div id='debug-target-2' style='display:block;width:100px;height:32px;border:none;position:absolute;right:0;top:0;z-index:101;'></div>
</div>
<div id='output-target-3' style='display:block;width:400px;height:100px;border:1px solid lightgrey;position:relative;'>
	<div id='debug-target-3' style='display:block;width:100px;height:32px;border:none;position:absolute;right:0;top:0;z-index:101;'></div>
</div>
<div id='output-target-4' style='display:block;width:400px;height:100px;border:1px solid lightgrey;position:relative;'>
	<div id='debug-target-4' style='display:block;width:100px;height:32px;border:none;position:absolute;right:0;top:0;z-index:101;'></div>
</div>

<script>
/*---- MAIN LIB ----*/
uIO = function(args, parent){
	this._parent = parent || false;
	args = args || {};
	args.rate = args.rate || 1000/60;
	var self = this;
	args.callback = args.callback;
	args.holdStart = args.holdStart || false;
	this._init(args);
	return this;
};


uIO.prototype._init = function(args){
	this._startedOn = null;
	this._lastTick = null;

	this._loop = null;
	this._lastTick = null;
	this._lastFrame = null;
	this._delta = 0;
	this._tick = 0;
	this._fps = 0;

	this.active = false;
	this._rate = args.rate;
	this._debugOn = false;

	if(!args.holdStart){
		this._start();
	}
};

uIO.prototype._start = function(){
	var now = (new Date()).getTime();
	this._startedOn = this._lastFrame = this._lastTick = now;
	var self = this;
	this.active = true;
	this._loop = setInterval(function(){
			self._run();
		}, 0);
};

uIO.prototype._run = function(){
	var now = (new Date()).getTime();
	if( now - this._lastFrame >= this._rate){
		this._RUN(now);
	}
	this._tick++;
	this._lastTick = now;
};

uIO.prototype._RUN = function(now){
		this._fps = (1000 / (now - this._lastFrame)).toFixed(0);
		this._delta = (now - this._startedOn) * 0.001;
		this._lastFrame = now;
		if(typeof this._parent == 'object'){
			this._parent._DRAW();
		}
		if(this._debugOn){this._debugLayer._DRAW()};
};


/*-----DEBUG LAYER STUFF------*/
uIO.prototype.showDebug = function(target){
	if(!this._debugOn){
		this._debugOn = true;
		this._debugLayer = new uIO.DEBUG(target || null, this);
	};
};

uIO.DEBUG = function(target, parent){
	this._parent = parent;
	this._target = document.getElementById(target) || document.body;
	this._canvas = document.createElement('canvas');
	this._canvas.style.width = "100%";
	this._canvas.style.height = "100%";
	this._target.appendChild(this._canvas);
	this._resize();
};

uIO.DEBUG.prototype._resize = function(){
	this._canvas.width = this._canvas.offsetWidth, this._canvas.height = this._canvas.offsetHeight;
	this._ctx = this._canvas.getContext('2d');
};

uIO.DEBUG.prototype._DRAW = function(){
	var cvas = this._canvas;
	var cW = cvas.width, cH = cvas.height;
	var ctx = this._ctx;
	ctx.clearRect(0,0,cW,cH);
	ctx.font = "16px Arial";
	ctx.fillText("FPS:",0,18);
	ctx.fillText(this._parent._fps,40,18);
};
/*-----END DEBUG LAYER STUFF------*/
/*-----VISUALIZER------*/
VIZ = function(name, target, shape){
	this._name = name || "New Visualizer"
	this._target = document.getElementById(target) || document.body;
	this._shape = VIZ.SHAPES[shape] || VIZ.SHAPES.SIN;
	this._init();

	return this;
};

VIZ.prototype._init = function(){
	this._io = new uIO({}, this);
	this._canvas = document.createElement('canvas');
	this._canvas.style.width = "100%";
	this._canvas.style.height = "100%";
	this._target.appendChild(this._canvas);
	this._resize();
};

VIZ.prototype._resize = function(){
	this._canvas.width = this._canvas.offsetWidth, this._canvas.height = this._canvas.offsetHeight;
	this._ctx = this._canvas.getContext('2d');
};

VIZ.prototype._DRAW = function(){
	var cvas = this._canvas;
	var cW = cvas.width, cH = cvas.height;
	var hw = cW*0.5, hh = cH*0.5;
	var ctx = this._ctx;
	ctx.clearRect(0,0,cW,cH);
	var _d = this._io._delta;
	var v = this._shape(_d);
	var posX = hw*v, height = cH*0.96;
	ctx.fillRect(hw, 3, hw*v, cH-3);

};


VIZ.SHAPES = {};
VIZ.SHAPES.SIN = VIZ.SHAPES['SIN'] = function(v){
	return Math.sin(v);
};
VIZ.SHAPES.COS = VIZ.SHAPES['COS'] = function(v){
	return Math.cos(v);
};
VIZ.SHAPES.TAN = VIZ.SHAPES['TAN'] = function(v){
	return Math.tan(v);
};


/*-----END VISUALIZER------*/
/*---- END MAIN LIB ----*/


/*---- Page Script ----*/
document.addEventListener('DOMContentLoaded', function(){
	var test1 = new uIO({}, false);
	test1.showDebug('output-target-1');
	console.log(test1);

	var test2 = new VIZ('First-Test', 'output-target-2');
	test2._io.showDebug('debug-target-2');
	console.log(test2);

	var test3 = new VIZ('Second-Test', 'output-target-3', 'COS');
	test3._io.showDebug('debug-target-3');
	console.log(test3);

	var test4 = new VIZ('Second-Test', 'output-target-4', 'TAN');
	test4._io.showDebug('debug-target-4');
	console.log(test4);

}, false);
/*---- END Page Script ----*/

</script>
</body>
With these changes now on the local client things are starting to take shape. I had to make quite a bit of modification to the sections of the code, lets review the updates.
Now tomorrow, I will clean up the display of the visualizer and make it more dynamic and also work out some more timing equations!
To be Continued…